How to use Auto Schedule to automatically place your planned tasks into time slots on your calendar, accounting for duration, existing events, and working hours.
Written By: Niall Jawad
1 min read
What We'll Cover
How Auto Schedule works
How to launch Auto Schedule from the sidebar
Adjusting priorities and durations before scheduling
Setting breaks, task limits, and custom constraints
Auto Schedule takes tasks that have been planned for a specific day, usually today, and places them into actual time slots on your calendar. It accounts for task durations, existing events, and your working hours, so you do not have to work out the scheduling manually.
How to launch Auto Schedule
Click the Auto Schedule button in the top right of the sidebar pane, or press Cmd+Shift+P. Aftertone opens the Auto Schedule flow.
Step 1: Adjust priorities and durations
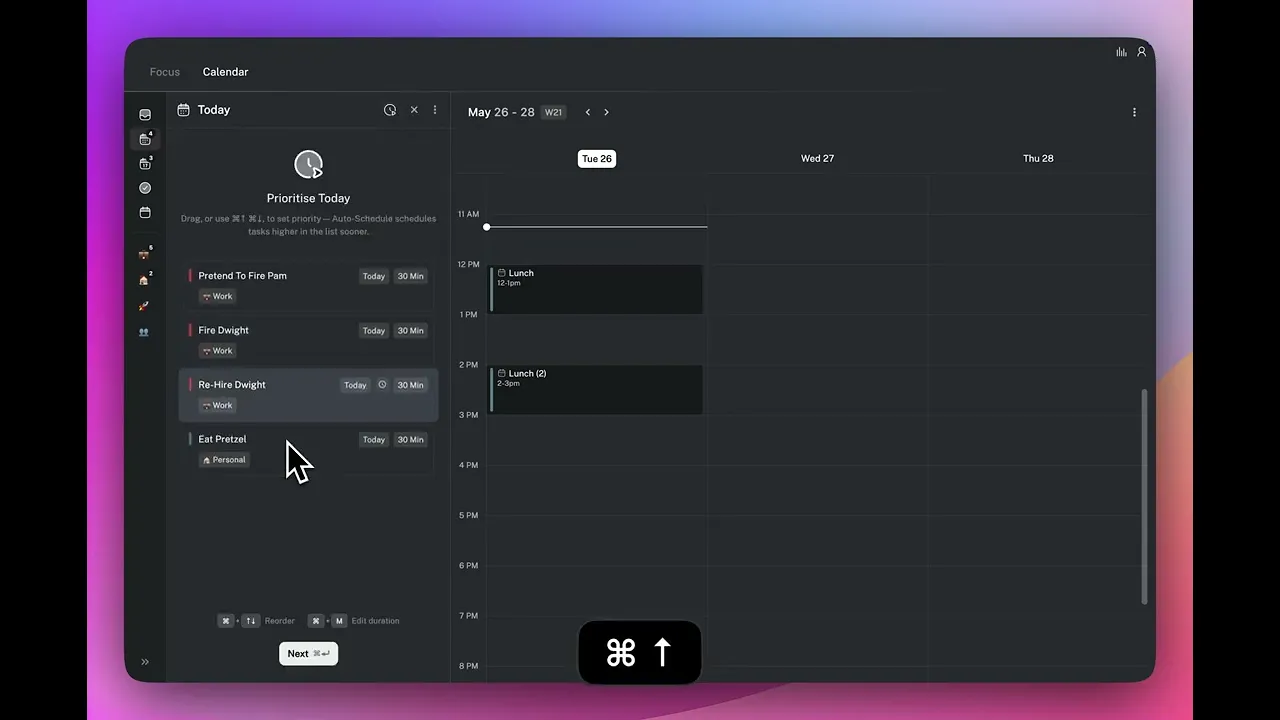
Aftertone shows you the tasks it is about to schedule. If you want to adjust the order or change any durations, press Cmd+M on any task to edit its duration directly. Reorder tasks by dragging or using Cmd+Up and Cmd+Down. Higher tasks are scheduled earlier in the day.
Step 2: Set breaks and task limits
Choose how many minutes of break you want between tasks, and set a maximum number of tasks per day. These act as guardrails - Aftertone will not schedule more than your limit or skip the breaks you have asked for.
Step 3: Add any constraints
An open text field lets you specify anything else Aftertone should take into account - for example, schedule nothing after 2pm tomorrow, or leave the morning free, or no back-to-back sessions. Aftertone incorporates this alongside your working hours and existing events.
What happens next
Aftertone places your tasks into available time slots, working around your existing calendar events and respecting your working hours. Blocks appear on the calendar immediately and sync to Google Calendar in real time.
👉 Try it now — Plan your tasks for today, press Cmd+Shift+P, adjust any durations with Cmd+M, and let Aftertone build your day.
Auto Schedule takes tasks that have been planned for a specific day, usually today, and places them into actual time slots on your calendar. It accounts for task durations, existing events, and your working hours, so you do not have to work out the scheduling manually.
How to launch Auto Schedule
Click the Auto Schedule button in the top right of the sidebar pane, or press Cmd+Shift+P. Aftertone opens the Auto Schedule flow.
Step 1: Adjust priorities and durations
Aftertone shows you the tasks it is about to schedule. If you want to adjust the order or change any durations, press Cmd+M on any task to edit its duration directly. Reorder tasks by dragging or using Cmd+Up and Cmd+Down. Higher tasks are scheduled earlier in the day.
Step 2: Set breaks and task limits
Choose how many minutes of break you want between tasks, and set a maximum number of tasks per day. These act as guardrails - Aftertone will not schedule more than your limit or skip the breaks you have asked for.
Step 3: Add any constraints
An open text field lets you specify anything else Aftertone should take into account - for example, schedule nothing after 2pm tomorrow, or leave the morning free, or no back-to-back sessions. Aftertone incorporates this alongside your working hours and existing events.
What happens next
Aftertone places your tasks into available time slots, working around your existing calendar events and respecting your working hours. Blocks appear on the calendar immediately and sync to Google Calendar in real time.
👉 Try it now — Plan your tasks for today, press Cmd+Shift+P, adjust any durations with Cmd+M, and let Aftertone build your day.